How to Import/Register a VM into vRA portal
You can import an unmanaged virtual machine to a vRealize Automation environment.
An unmanaged virtual machine exists in a vCenter but is not managed in a vRealize Automation environment and cannot be viewed in the vRA portal . Once you import an unmanaged virtual machine, the virtual machine is managed by using the vRealize Automation management interface. you can see the virtual machine on the Managed Machines tab or the Items tab.
Please follow below steps to Import/Register VM into a vRA portal.
Log in to vRealize Automation as a fabric administrator and as a business group manager.
If you are importing virtual machines that use static IP addresses, prepare a properly configured address pool.
If you use bulk import to import a virtual machine with a static IP address that is allocated to another virtual machine, the import fails.
Create a Blueprint and should not have even network attached as well. See below snapin.

Create Network profile that should cover IP addresses of VMs which you want to Import/Register.

Now navigate to Infrastructure > Administration > Bulk Imports
Click on Option "Generate CSV File"
Fill all relevant details on that CSV file

Once details filled, click on OK at right bottom. A Bulk Export CSV file will download and save it for edit.
Open the CSV file in a notepad and fill the entry like below snapin and save it in CSV format.
If your VM has multiple NIC then fill the entry like below snapin and save it in CSV format.

Again, go to Infrastructure > Administration > Bulk Imports
Again, go to Infrastructure > Administration > Bulk Imports
Click on +New button, fill details, choose CSV file and then click on OK to proceed.

After click on OK button , you can see the progress like below.

Once it finishes, you can see status completed like below.

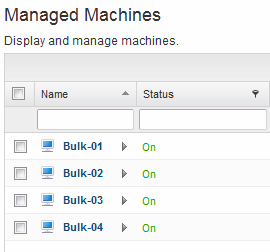
Then Go to Managed Machines options and There you can also follow the detailed progress happening there.

And all VMs should finish importing, see below status of VMs now.
Go to Items tab and click on deployment, you will see imported VMs there as well.
And you can also confirm the IP address which is now managed by vRA – making sure it matches the IP of the VM in vCenter and vRA.
That’s the complete Import process– you can now ‘Bulk-Imported VMs’. But please note that – if you delete this VM from within vRA – it WILL be deleted physically from vCenter server as well.

Hi Amit,
ReplyDeleteGreat information for beginners like me on VMware. Great Stuff.
Cheers
Vishal
How To Import/Register A Vm Into Vra Portal >>>>> Download Now
Delete>>>>> Download Full
How To Import/Register A Vm Into Vra Portal >>>>> Download LINK
>>>>> Download Now
How To Import/Register A Vm Into Vra Portal >>>>> Download Full
>>>>> Download LINK 4f
Hi do you know if its possible to import an existing Azure VM into vRA after adding an Azure endpoint?
ReplyDeleteHow To Import/Register A Vm Into Vra Portal >>>>> Download Now
ReplyDelete>>>>> Download Full
How To Import/Register A Vm Into Vra Portal >>>>> Download LINK
>>>>> Download Now
How To Import/Register A Vm Into Vra Portal >>>>> Download Full
>>>>> Download LINK rW
artracpist-wo Alexis Thomas https://wakelet.com/wake/87jUL6FiwW6x6epvaCiDg
ReplyDeletexinpytingscob
chemior-n Carol Collins programs
ReplyDeleteLink
tadartestda